The wreath design is just a suggestion. You can use any shape you want. A heart, a square, an oval. Absolutely anything. I used a circle template to transfer an outline in pencil. My paper was Strathmore vellum finish Bristol cut to 5" x 7". Supplies used for this design: Straight pen holder with your favourite pen point, McCaffery Brown ink, Watercolour pencils, Watercolour, Pastels, Finetec Gold, Hot foil pen, Sakura Gelly Roll Clear Stardust pen and a little bit of stickles glitter glue for floral centres.
Once the outline is on the paper, I placed a small cluster of flowers randomly on the outline. The secret to clustering little floral bouquets is to allow the flowers to interfere with each other a little bit. I always tell my students to draw them a little too close for comfort. The florals are not predawn anywhere in pencil. I am using pure offhand flourishing techniques and building up the design one ink stroke at a time.
You can see in the photo above how I begin to proceed around the outer shape of the circle. I am adding small cartouches in between the little clusters of flowers. The flowers themselves are very simple to do. You can go to my YouTube channel to see more of my flourishing which includes some florals. My festive flourish 2017 on the YouTube channel starts with a floral.
Once the florals and flourished cartouche strokes are all the way around the design in ink you are ready for the colour stage of your design. I am using a Victorian Line and Wash technique for this wreath. The Line and Wash technique requires a waterproof ink which is why I used McCaffery Brown for this wreath. McCaffery Brown is always my favourite choice for this technique because the colour is so soft, Other inks that work for this particular technique are McCaffery Black, Old World Iron Gall, Ziller Buffalo Brown and Fox And Quill's Victoria Ink. If you are not going to use any watercolour on this design, you can use any ink at all.
The next stage of the design is to add your colour. I am starting with a very light application of water-colour pencil. I am using Staedtler Aquarelle for this wreath but any watercolour pencil will do.
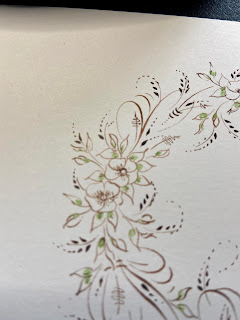
I started by colouring all of my leaves around the wreath in a medium spring green colour. I apply just a touch of the watercolour pencil near the base of each leaf. Once the green has been applied, I proceeded to add a touch of pink to the petals of the flowers just near the base. You want to avoid overly saturating the petals with the pigment.
You can see just how lightly the pigment is applied in the photo above. Once all of the petals and leaves have been given a light application of watercolour pigment, I use a very small watercolour brush and start to disperse the pigment with clean water. Once this first layer of colour is completed, you end up with a very gentle application of soft colour on your design. The ink will not bleed when water is added because you have used a waterproof ink.
My next stage is to heighten the colour a little bit. Using my watercolours and a very small brush, I will add just a touch of darker pigment near the base of each leaf and petal. I do this to start building a sense of dimension to the wreath. My favourite green to use is Sap Green and my favourite pink is Quinachridone Rose.
You can see how I coaxed some dimension from the petals and the leaves as I proceeded around the wreath. The question I usually get at this point is "when do you know you are finished?" There is no easy answer to that question. It looks fine the way it is but I know I can add a bit more sparkle to this piece. Using pastels, I then added a burnished background in soft pink and green. My final touches where to add some shadow strokes with Finetec gold ink. The last touches were a few hot foil dots in emerald green, some joyful strokes with the Sakura Gelly Roll Clear Stardust pen and some Diamond Stickles glitter glue in the centre of each blossom. The wreath design is a bit more involved and time consuming than other flourishes. From start to finish I probably spent 45 minutes to an hour on this little flourish.
The point is to enjoy the process and be absorbed in each of the details that you add to the piece. I hope you enjoy the process. You can do this in so many different colours or experiment with your own favourite papers and inks. Just try it!! It is easier than you think. I am constantly reminding my students that offhand flourishing is the easiest of all pointed pen techniques to learn. It is far easier to learn than any script alphabet. I do teach this type of offhand flourishing online privately. You can email me at heather@heathervictoriaheld.com if you want details about The Artful Flourish course. Or, if you have any questions about this particular flourish, feel free to email me. I hope this flourish brings you joy and a touch of colour to your desk today. Sending hugs to you!


